Buick Encore: Floor coverings and headlinings - Installation Procedure
Buick Encore 2012-2019 Service Manual / Accessories & Equipment / Floor Coverings and Headlinings / Floor coverings and headlinings - Installation Procedure
Fig. 92: Headliner Trim Panel Retainers
- With the aid of an assistant, position the headliner trim panel assembly (2) into the vehicle through the liftgate opening.
- Connect the electrical connectors to the headliner trim panel assembly (2).
- Tape any unused connectors to the headliner with a high adhesive tape.
- Install the 3 headliner trim panel retainers (1).
.jpg)
Fig. 93: Body Lock Pillar Upper Trim Panel
- Install the body lock pillar upper trim panel (3). Refer to Body Lock Pillar Upper Trim Panel Replacement .
Fig. 94: Center Pillar Upper Trim Panel Assembly
- Install the center pillar upper trim panel assembly (3). Refer to Center Pillar Upper Trim Panel Replacement (Encore) .
.jpg)
Fig. 95: Rear Seat Position Center Courtesy Lamp
- Install the rear seat position center courtesy lamp (1). Refer to Rear Seat Position Center Courtesy Lamp Replacement .
.jpg)
Fig. 96: Roof Console Assembly
- Install the roof console assembly (2). Refer to Roof Console Replacement .
.gif)
Fig. 97: Windshield Outside Moisture Sensor Cover
- Install the windshield outside moisture sensor cover (1). Refer to Windshield Outside Moisture Sensor Cover Replacement (Encore) .
.gif)
Fig. 98: Roof Rail Front Stowage Compartment
- Install the roof rail front stowage compartment (2). Refer to Roof Rail Front Stowage Compartment Replacement (Encore) .
.gif)
Fig. 99: Roof Rail Rear Assist Handle Assembly
- Install the roof rail rear assist handle assembly (2). Refer to Roof Rail Rear Assist Handle Replacement (Encore) .
.gif)
Fig. 100: Roof Rail Assist Handle Assembly
- Install the roof rail assist handle assembly (2). Refer to Roof Rail Assist Handle Replacement (Encore) .
.gif)
Fig. 101: Sunshade Support Assembly
- Install the sunshade support assembly (2). Refer to Sunshade Support Replacement (Encore) .
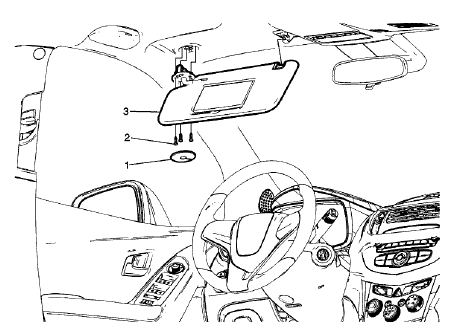
Fig. 102: Sunshade Assembly
- Install the sunshade assembly (3). Refer to Sunshade Replacement (Encore) .
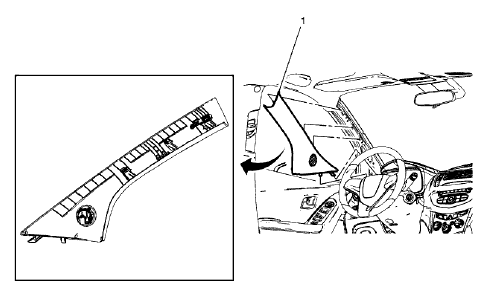
Fig. 103: Windshield Garnish Molding Assembly
- Install the windshield garnish molding assembly (1). Refer to Windshield Garnish Molding Replacement (Encore) .
- Enable the SIR system. Refer to SIR Disabling and Enabling .
READ NEXT:
 Instrument Panel and Console Trim - Repair instructions
SPECIFICATIONS
FASTENER TIGHTENING SPECIFICATIONS
Fastener Tightening Specifications
REPAIR INSTRUCTIONS
INSTRUMENT PANEL LOWER TRIM PANEL INSULATOR REPLACEMENT
Fig. 1: Instrument Panel Lower Trim
Front floor console wiring harness replacement (encore)
Fig. 120: Front Floor Console Wiring Harness
Front Floor Console Wiring Harness Replacement (Encore)
FRONT FLOOR CONSOLE WIRING HARNESS REPLACEMENT (Encore)
Fig. 121: Front Floor Console Wiring
SEE MORE:
Firing Order & Cylinder Identification
FIRING ORDER & CYLINDER IDENTIFICATION
NOTE: This information is intended as a quick reference for firing
order and cylinder
identification only. The information provided covers many vehicles and may
include some information that does not apply to the vehicle you have currently
selected.
3 CYLI
Climate Control Systems
The heating, cooling, defrosting, and ventilation for the vehicle can be
controlled with this system.
Temperature Control
Air Delivery Modes
Fan Control
Defrost
Rear Window Defogger
Air Conditioning
Recirculation
The following are climate control
settings that use more fuel:
Defro
© 2020-2026 Copyright www.bencore2.com
