Buick Encore: Oil pump
NOTE:
Examples used in this article are general in nature and do not necessarily relate to a specific engine or system. Illustrations and procedures have been chosen to guide mechanic through engine overhaul process. Descriptions of processes of cleaning, inspection, assembly and machine shop practice are included.
Always refer to appropriate engine overhaul article, if available, in the ENGINES section for complete overhaul procedures and specifications for the vehicle being repaired.
ROTOR TYPE
NOTE: Examples used in this article are general in nature and do not necessarily relate to a specific engine or system. Illustrations and procedures have been chosen to guide mechanic through engine overhaul process. Descriptions of processes of cleaning, inspection, assembly and machine shop practice are included. Always refer to appropriate engine overhaul article, if available, in the ENGINES section for complete overhaul procedures and specifications for the vehicle being repaired.
Mark oil pump rotor locations before removing. See Fig. 30. Remove outer rotor and measure thickness and diameter. Measure inner rotor thickness. Inspect shaft for scoring or wear. Inspect rotors for pitting or damage.
Inspect cover for grooving or wear. Replace worn or damaged components.
Measure outer rotor-to-body clearance. Replace pump assembly if clearance exceeds specification. Measure clearance between rotors. See Fig. 31. Replace shaft and both rotors if clearance exceeds specification.
Install rotors in pump body. Position straightedge across pump body. Using feeler gauge, measure clearance between rotors and straightedge. Pump cover wear is measured using a straightedge and feeler gauge. Replace pump if clearance exceeds specification.
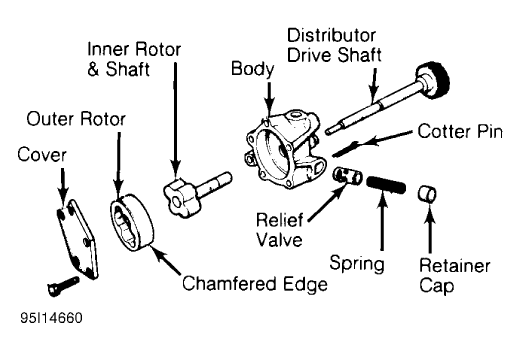
Fig. 30: Typical Rotor Type Oil Pump
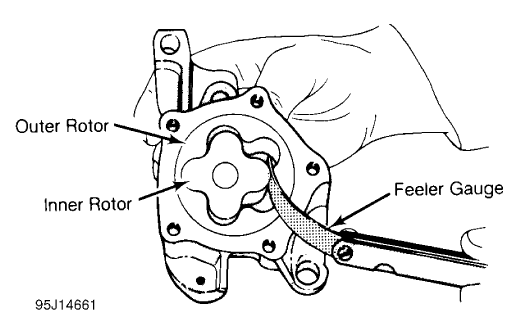
Fig. 31: Measuring Rotor Clearance
GEAR TYPE
NOTE: Examples used in this article are general in nature and do not necessarily relate to a specific engine or system. Illustrations and procedures have been chosen to guide mechanic through engine overhaul process. Descriptions of processes of cleaning, inspection, assembly and machine shop practice are included.
Always refer to appropriate engine overhaul article, if available, in the ENGINES section for complete overhaul procedures and specifications for the vehicle being repaired.
Mark oil pump gear location before removing. See Fig. 32. Remove gears from pump body. Inspect gears for pitting or damage. Inspect cover for grooving or wear. Measure gear diameter and length. Measure gear housing cavity depth and diameter. See Fig. 33. Replace worn or damaged components.
Pump cover wear is measured using a straightedge and feeler gauge. Replace pump or components if warpage or wear exceeds specification, or mating surface of pump cover is scratched or grooved.
.gif)
Fig. 32: Typical Gear Type Oil Pump
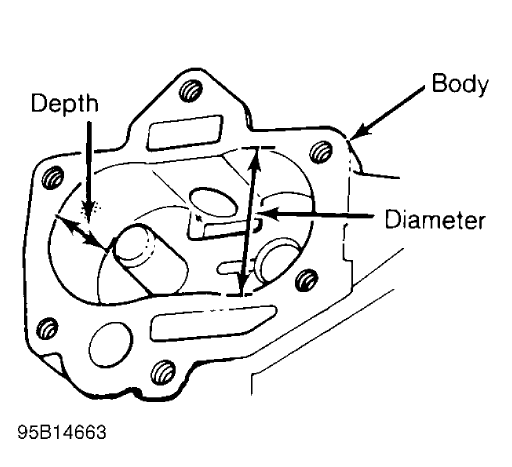
Fig. 33: Measuring Oil Pump Gear Cavity
READ NEXT:
 Break-in procedure
NOTE: Examples used in this article are general in nature
and do not necessarily relate
to a specific engine or system. Illustrations and procedures have been chosen
to guide mechanic through engine
Engine Performance Diagnostic Routine Outline
NOTE: This article is generic in nature and all information
does not apply to all
vehicles. For vehicle specific information, see the appropriate articles in the
ENGINE PERFORMANCE category.
WHERE DO
Engine Performance Safety Precautions
Always refer to Emission Decal in engine compartment before servicing
vehicle. If manual and decal
differ, always use decal specifications.
Do not allow or create a condition of misfire in more
SEE MORE:
Mirrors - Repair instructions
OUTSIDE REARVIEW MIRROR REPLACEMENT
Fig. 7: Outside Rearview Mirror
Outside Rearview Mirror Replacement
OUTSIDE REARVIEW MIRROR HOUSING UPPER COVER REPLACEMENT
Fig. 8: Outside Rearview Mirror Housing Upper Cover
Outside Rearview Mirror Housing Upper Cover Replacement
OUTSIDE REARVIEW MIR
Schematic wiring diagrams
SPECIFICATIONS
FASTENER TIGHTENING SPECIFICATIONS
Fastener Tightening Specifications
SCHEMATIC WIRING DIAGRAMS
RADIO/NAVIGATION SYSTEM WIRING SCHEMATICS (ENCORE)
Power, Ground, Serial Data, Antenna, and Audio Input
Fig. 1: Power, Ground, Serial Data, Antenna, and Audio Input
Amplifier Power, Gro
